
You may have noticed that I became a little infatuated with forced perspective photography over the summer. Though, I’m probably not the only one. Forced perspective photography is a really popular trend over on Instagram at the moment and it’s a technique that isn’t as tricky to master as you might think!
In this post, I will tell you how I create forced perspective photos for my Instagram account, as well giving you tons of inspiration to help you to come up with your own concepts.
Forced perspective photography is a technique that creates optical illusions by making an object appear larger, smaller, farther or closer than it really is.
There are a few ways in which you can create forced perspective shots. One requires more time adjusting your camera settings and making sure your subjects are in position; the other can be shot in moments, but requires more time editing. I’ll begin with the first method.

Minimal Editing Method
When you want to make an object feel larger or smaller than it really is, you need to play around with the distance between your subjects.
To recreate a photo similar to the one above, you could set your camera up on a tripod and hold a tea cup, or prop of your choice, close to the camera lens. You would then need a second subject positioned further away. For example, in this photo, Charlie was stood against the wall pouring tea into a bucket on the floor.
To play with the perspective and to change the size of the subjects, all you then need to do is to move them closer or farther away from the camera lens.
It’s as simple as that.
One of the things I find frustrating about this method is that it can be tricky to get the focus and depth of field (blurry background or foreground) how I like it. I don’t think there’s a right or wrong way, but I prefer both subjects to be reasonably sharp in the image.
My camera doesn’t do this automatically, so it would mean taking time to adjust the settings to get it right. If you’re happy to experiment in manual, to keep the entire scene sharp, you can try using a high f-stop number and a wide angle lens (35mm or less). Personally, I find this to be a bit of a faff, but I’m sure it would get easier with practice.

Making Forced Perspective Shots Using Photoshop
Most of my photos include my children, which means I don’t have a lot of time to get the right shot.
For this reason, I much prefer to take a series of photos and then combine them later using photoshop. I tend to use the Photoshop Mix App, because it’s convenient and it works much faster than the photoshop software on my laptop.
You do need an adobe subscription to use the photoshop mix app, but there may be free apps available if you have a look around.
The photo of the beach above is a combination of 4 different images. The first is Elodie on the beach, then one of me holding the ice cream, another of ice cream dripping, and then one of a little sail boat.
So here’s how I do it …
Before using the photoshop mix app, I import my photos into lightroom (also a paid for adobe app) and try to even out exposure, saturation and contrast between the images I want to combine.
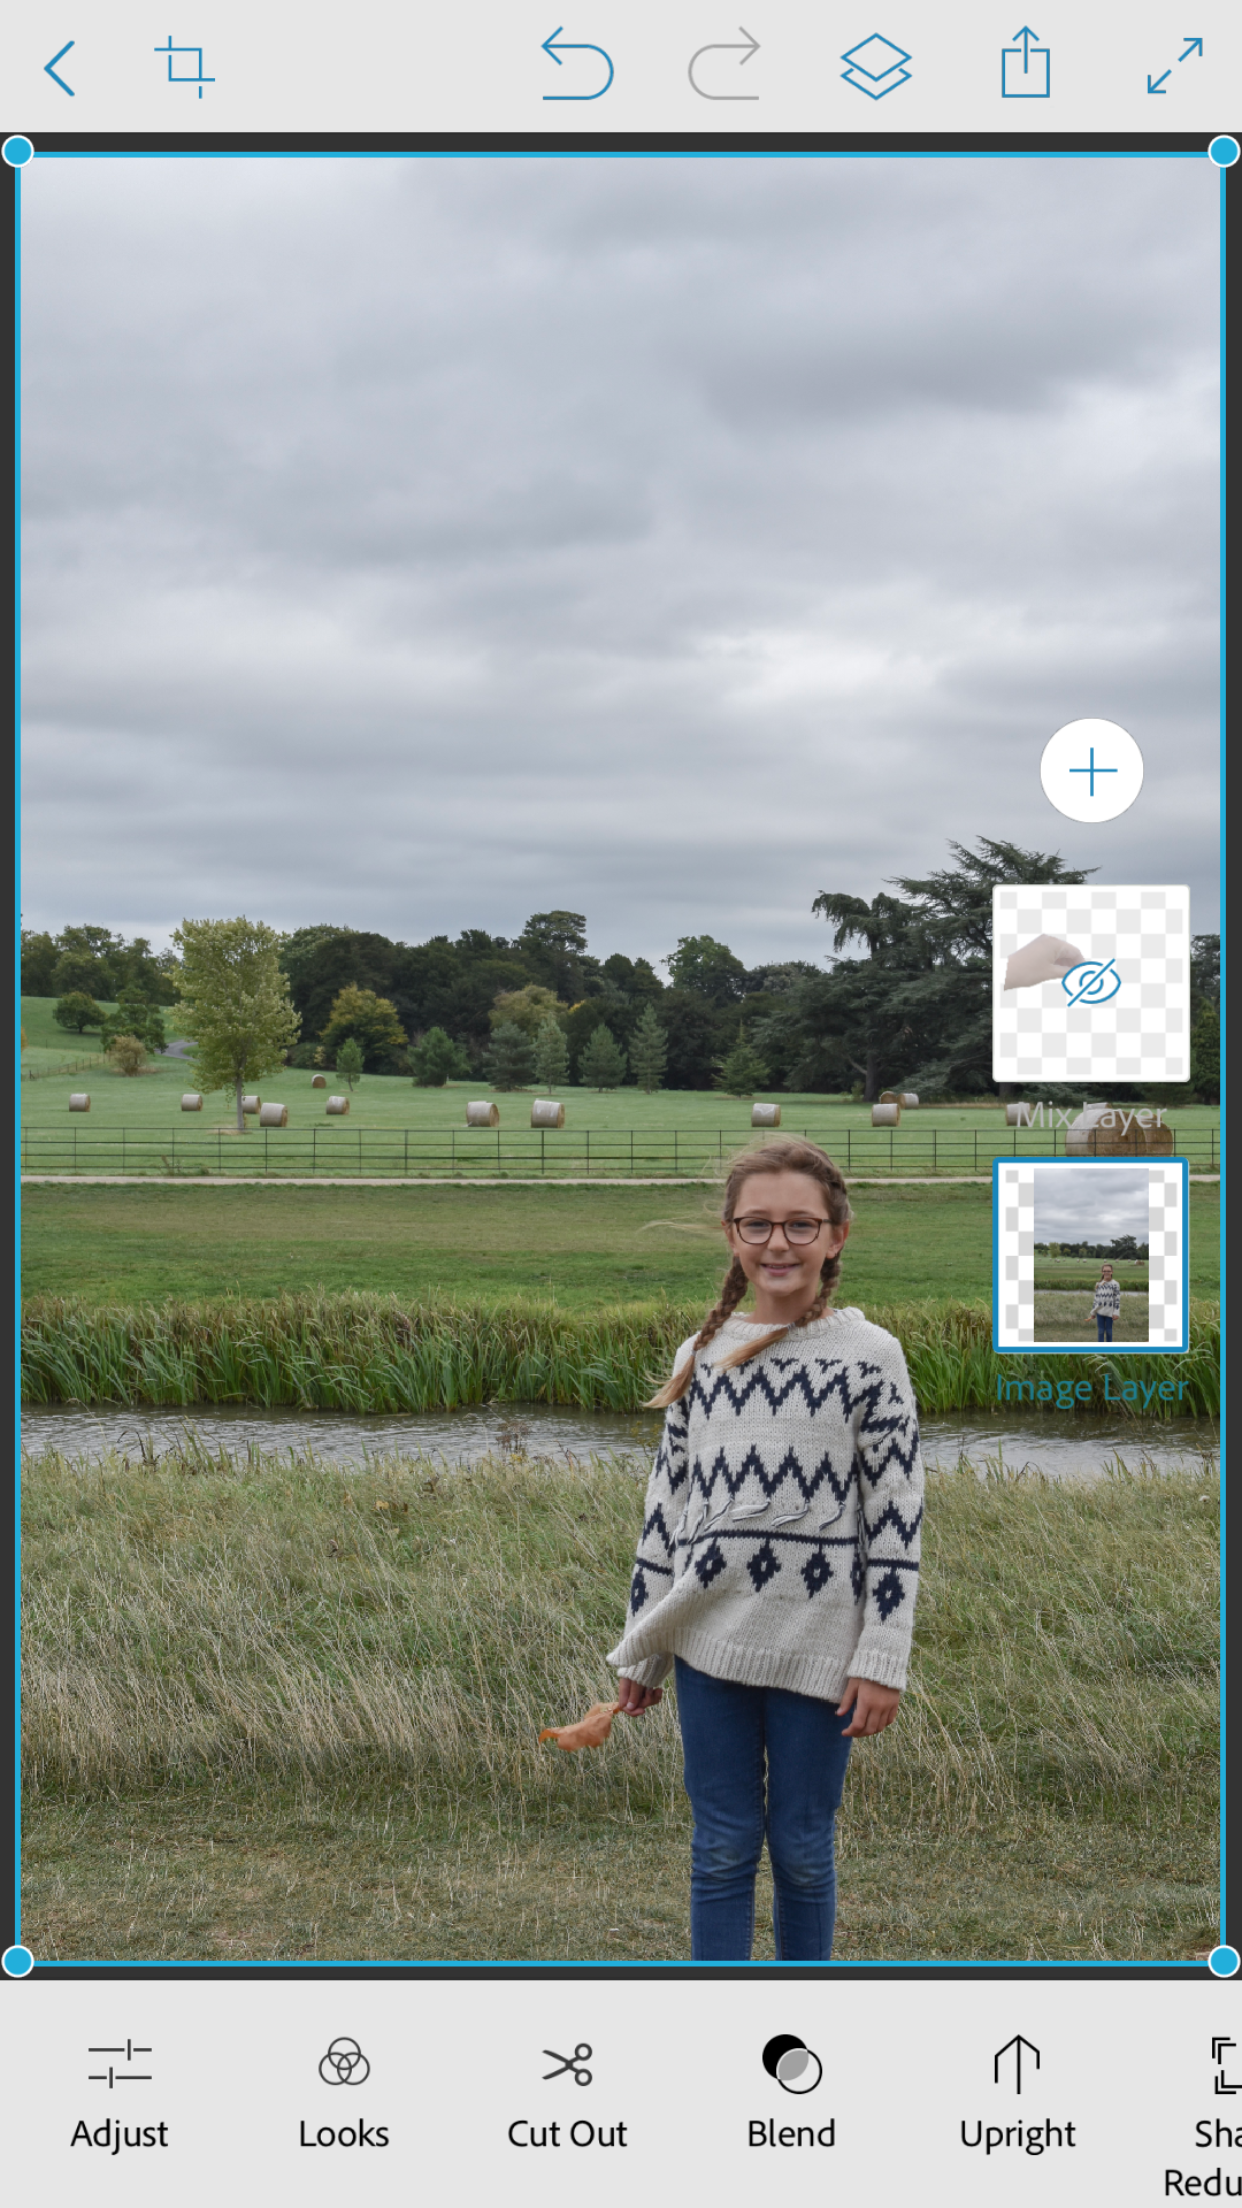
I then open the photoshop mix app and create a new project. The next thing to do, is to select my background image from my photo album, before hitting the little plus sign on the right hand side to add the image I want to layer on top.
To select and cut out the part of the photo that I want to add to my background image, I first hide the background layer by double tapping it’s little square on the right, before tapping the little eye icon in the menu.
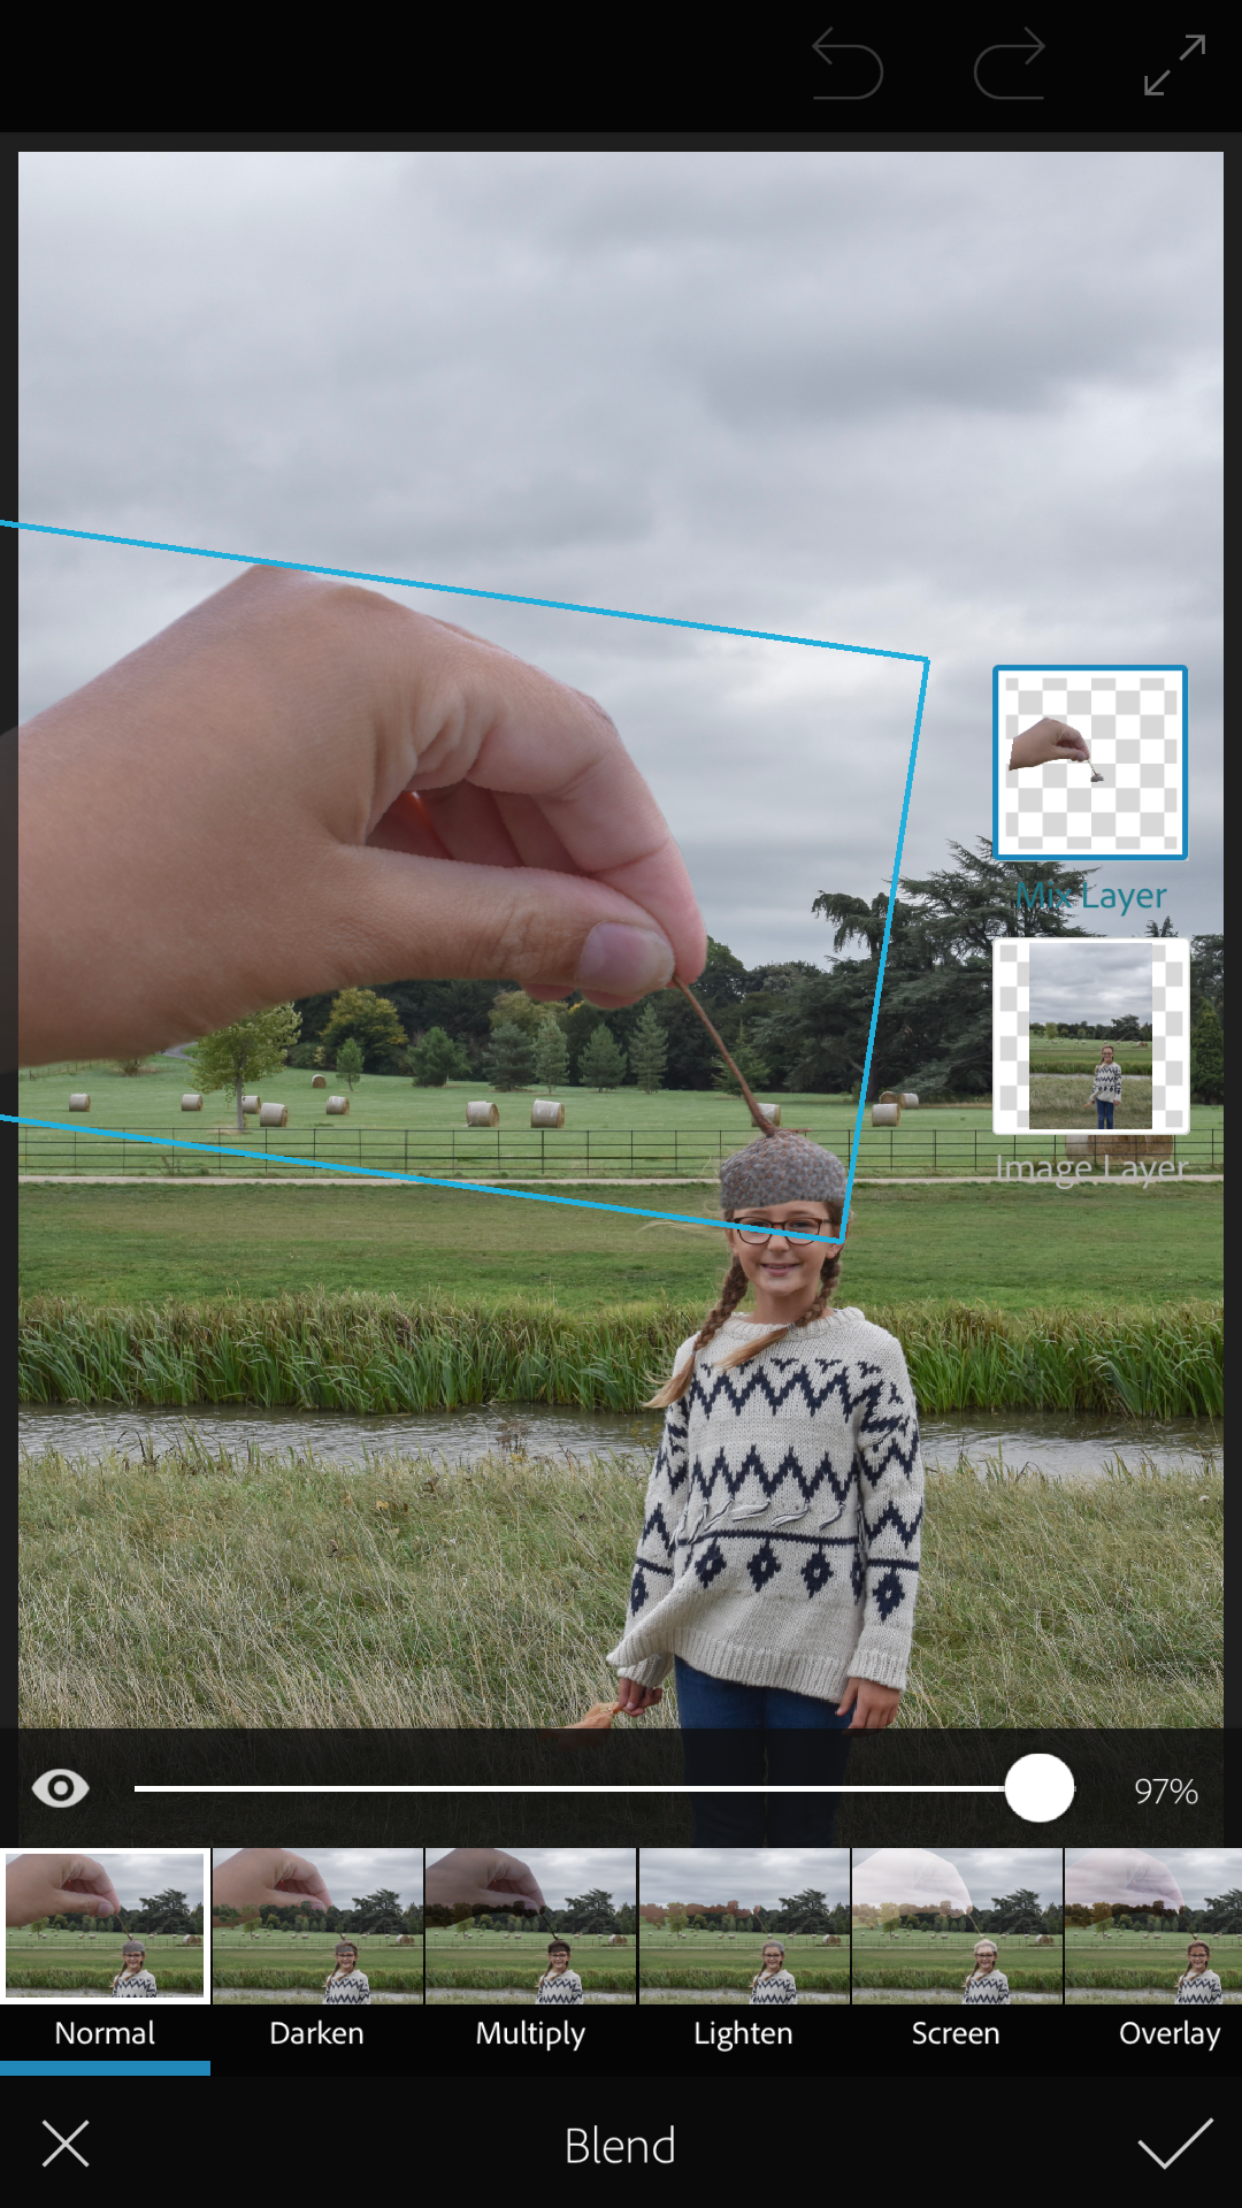
I then use a mixture of the smart and basic cut out tools to select the object I want to cut out from my photo. I try to cut out slightly in the inside edge of the object because I find this helps with blending the images together.
Once you’ve done all that, you will be left with something that looks a bit like this …

To bring back your background image, all you need to do is to repeat the steps of selecting the square on the right hand side relating this image and hit the little eye icon again.
This will leave you with something that looks a bit like this …
To move and resize the layer image, first make sure you have this image selected using the boxes on the right hand side. Then you can pinch to resize and slide to move the image into your desired position.
If you feel you need to work on blending the two images together, again double tap the little square for the image that you’d like to blend, then use the blending slider to try different percentages out, until you have the desired effect.
You can duplicate your layers and use the different blend options to create more realistic effects, but I haven’t found this to be necessary.

Once I’ve finished blending the photos together in the photoshop mix app, I then export the photo and run it through my favourite editing app, VSCO.
In VSCO, I add a filter (usually preset A7, set to help strength or less) and then crop ready to share to Instagram!
If you’re yet to try creating perspective images yourself and are looking for a few tips to get started, then I really hope this post was of use to you! I’ve also put together a Pinterest board where I’ve pinned some of my favourite examples of this technique to help you get inspired!
If you have any questions, or anything I have said here doesn’t quite work for you, then drop me a message on Instagram (I’m always on there!) and I will do my best to help!
Pin it for later:

